How to Install and Use the Haloview BT7 with TPMS Sensors and Axle Temperature Sensors: A Complete Guide for RVers
Whether you’re heading out for rally season or logging thousands of miles towing across the country, keeping tabs on your tires and axles isn’t just smart—it’s essential. A tire blowout or overheated bearing at highway speed can turn a great trip into a nightmare in seconds.
That’s why we installed the Haloview Byte Tango BT7 on our rig, complete with TPMS (Tire Pressure Monitoring System) sensors and the new Axle Temperature Sensors (ATS). Here’s our full rundown on installation, setup, and real-world use.
What Is the HaloView BT7?
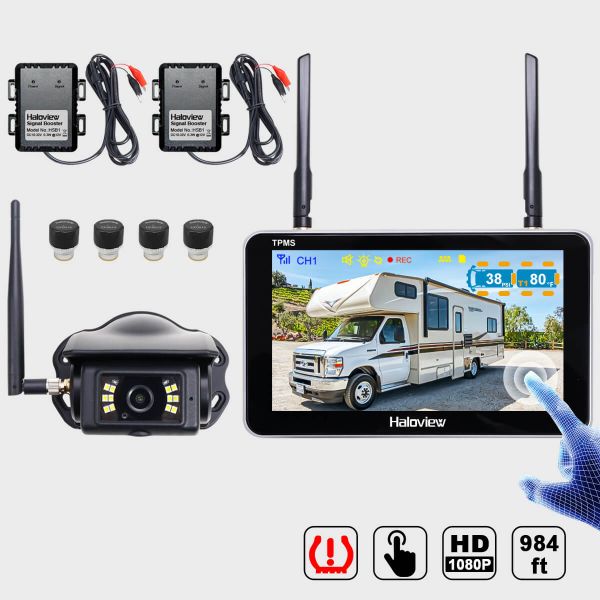
The Haloview BT7 is the world’s first integrated wireless backup camera and RV tire pressure monitoring system. It combines two critical safety features into a single 7-inch touchscreen display:
• 1080P wireless backup camera with Wide Dynamic Range (WDR) technology for clear video in all lighting conditions
• Built-in TPMS that monitors up to 32 tires in real time, displaying pressure and temperature data on a single screen
The system operates on a 2.4 GHz wireless frequency with up to 984 feet of line-of-sight transmission range, making it suitable for rigs up to 65 feet. It powers through either a standard 12V cigarette lighter or a USB Type-C 5V port, giving you flexible mounting options in the cab.
What’s in the Box
The BT7 TPMS package includes:
• 1x BT7 TPMS 7” touchscreen monitor
• 1x BTC128W rear camera (with WDR technology)
• 4x TPMS sensors (additional sensor packs available in 1, 2, or 4-packs for trailers and dually setups)
• 2x signal boosters (repeaters)
For the Axle Temperature Sensors, you can purchase them individually or in packs:
• 2-pack for single-axle trailers
• 4-pack for tandem-axle fifth wheels and travel trailers
• Each ATS includes a CR1632 battery and an anti-slip adhesive heat sink mat
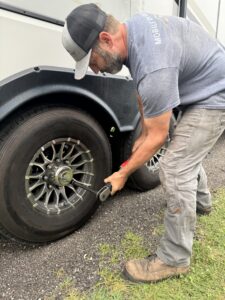
Installing the TPMS Sensors
Step 1: Prep Your Valve Stems
 This is important—Haloview strongly recommends brass metal valve stems for their TPMS sensors. If your tires currently have rubber, plastic, or aluminum alloy valve stems, have your tire dealer swap them out for brass before installation. Make sure the dealer leaves enough clearance so the sensors don’t contact the wheel rim.
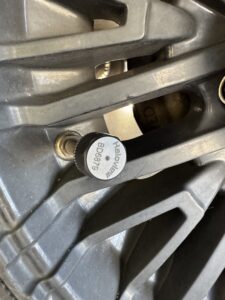
Step 2: Thread On the Sensors
Installation is refreshingly simple. Each TPMS sensor threads directly onto your tire’s valve stem—no tools required beyond hand-tightening. The sensors include anti-theft lock nuts to keep them secure on the road. They’re lightweight, compact, waterproof, and rated for all weather conditions.
Step 3: Mount the Monitor
Secure the BT7 monitor on your dashboard using the included suction cup mount or an optional mirror mount or T-slot bolt mount. Connect it to power via the cigarette lighter adapter or USB-C cable.
Step 4: Pair the Sensors
The BT7 offers two pairing methods:
• AUTO Learn: A one-click pairing option—the monitor automatically detects and assigns nearby sensors
• Manual ID: Enter each sensor’s unique ID code manually through the on-screen keyboard
The TPMS menu displays all tire positions, code buttons, and the keyboard in a single view, making the process straightforward even if you’re running 8+ sensors across your truck and trailer.
Step 5: Install the Signal Boosters
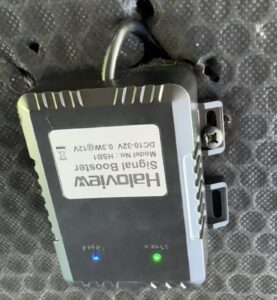 For longer rigs, the included signal boosters (repeaters) are key. Hard-wire them to a 12V or 24V source on your trailer to extend the wireless signal from the rear-axle sensors to the cab monitor. This ensures consistent readings even on a 40+ foot fifth wheel.
I also have another repeater in the front bay. The system comes with 2 repeaters.
Step 6: Set Your Alerts
Customize your pressure and temperature thresholds for each tire position. The BT7 alerts you for:
• High tire pressure
• Low tire pressure
• High temperature
• Fast leaks
• Slow leaks
• Lost sensor signal
• Low sensor battery
When any reading deviates from your preset parameters, the monitor triggers both visual and audio warnings immediately.
Installing the Axle Temperature Sensors (ATS)
 The ATS is Haloview’s newest addition and one we’re particularly excited about. These sensors clamp directly onto the axle near each wheel to monitor bearing and spindle temperature in real time—catching overheating from dragging brakes or failing bearings before it becomes a catastrophic roadside failure.
Compatibility Check
Before purchasing, confirm your axle setup is compatible:
• Designed for: Straight axles, MorRyde IS systems, and Curt TCS systems
• May work on: Some torsion axle systems, depending on available clearance for the clamp
• Compatible monitors: HaloView BT7 TPMS, BT7 TPMS Solar, and BT10 TPMS
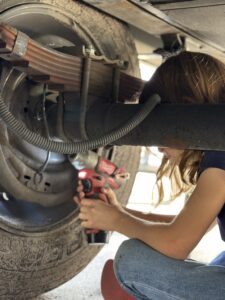
 Step 1: Find Your Mounting Position
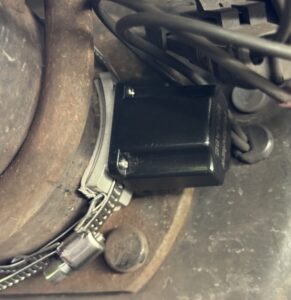
Clamp each ATS sensor onto the back of the axle as close to the wheel as possible. Look for a smooth, flat spot on the axle tube. The sensor sits on an aluminum plate that conducts heat from the axle for accurate readings.
Step 2: Secure the Clamp
Tighten the included clamp hardware to secure the sensor firmly to the axle. Apply the anti-slip adhesive heat sink mat between the sensor and axle for better thermal contact and to prevent shifting during travel.
Step 3: Pair with Your BT7
ATS sensors must be paired manually with the BT7 (AUTO Learn is not available for axle sensors). Enter each sensor’s ID code through the monitor’s TPMS menu. Once paired, they appear alongside your tire data on the same scree
Step 4: Set Temperature Alerts
Configure a custom high-temperature threshold for each axle position. Under normal towing conditions, axle temps will typically run 15–20°F above ambient temperature. If a bearing starts to go or a brake is dragging, you’ll see that number climb well beyond normal—and the BT7 will alert you with a red warning and audible alarm before things get dangerous.
Installing the Rear View Camera
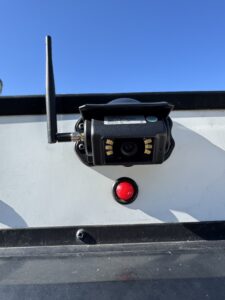 The Haloview backup camera is a direct replacement for the Furrion backup camera if that is already installed or “prepped” for install on your RV. The screw holes even line up in the same place for ease of installation. My camera immediately paired to the head unit, however, if you need to pair the camera there is a pairing button on the bottom of the camera to make it communicate with the head unit
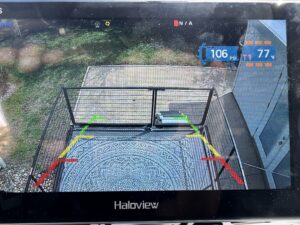
Real-World Performance
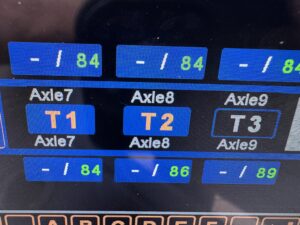
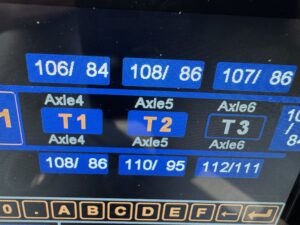 NOTE: The white numbers represent the TPMS sensors and the green numbers represent the Axle Temperature Sensors. These readings are at a campsite and not on the road during operating conditions.
After running this full setup on our rig, here’s what we’ve found:
• TPMS accuracy is rated at ±1.5 PSI and ±6°F, and in our experience it’s been spot-on
• Pressure range of 0–218 PSI covers everything from light-duty tow vehicles to heavy commercial truck tires
• Real-time overlay on the camera view cycles through each tire’s pressure and temperature reading every 5 seconds—so you can monitor without leaving the camera screen
• Axle temps during a multi-hour tow stayed consistent and closely tracked what the tire sensors reported, giving us confidence the readings are reliable
• Wireless signal remained solid throughout thanks to the signal boosters—no dropouts even on our longer rig
• Battery life on the sensors is approximately one year, and the CR1632 batteries are user-replaceabl
e
Why This Matters for RV Safety
Tire failures and bearing breakdowns are among the most common—and most preventable—causes of RV roadside breakdowns. Here’s what monitoring protects you from:
• Blowouts caused by underinflation or overheating
• Slow leaks that go unnoticed until it’s too late
• Bearing failures that can lead to wheel separation
• Dragging brakes that overheat axle components
Manually checking hub temps with a temperature gun at every fuel stop is better than nothing, but it’s a snapshot in time. The HaloView system gives you continuous, real-time data right on your dash while you’re driving—when it matters most.
Tips and Best Practices
1. Check sensor batteries annually. Mark your calendar for a yearly battery swap—CR1632 batteries are inexpensive and easy to replace.
2. Use brass valve stems. Don’t skip this step. The wrong valve stem material can damage both the sensor and the rim.
3. Install signal boosters on your trailer. Even if your rig is under 30 feet, the boosters improve reliability and signal consistency.
4. Set conservative alert thresholds. It’s better to get an early warning than a late one. Set your high-temp and low-pressure alerts a little tighter than you think you need.
5. Inspect ATS clamp tightness periodically. Road vibration can loosen hardware over time—give them a quick check during your regular pre-trip inspections.
6. Keep a spare sensor and batteries in your tool kit. If a sensor fails mid-trip, you’ll want a replacement ready to go.
Final Thoughts
The Haloview BT7 with TPMS and Axle Temperature Sensors is one of the best investments we’ve made for towing safety and peace of mind. Having real-time tire pressure, tire temperature, and axle temperature data all on one screen—alongside a 1080P backup camera—means we can focus on enjoying the road instead of worrying about what’s happening behind us.
Regular inspections and routine maintenance keep you off the side of the road. Adding a monitoring system like this takes it a step further—it keeps you informed between those inspections, every mile of the way.
Safe travels out there.
Have questions about the Haloview BT7 or need help with installation? Drop a comment below or reach out to us—we’re happy to help fellow RVers keep their rigs rolling safely.